

A bare LED strip light often looks more like a row of harsh dots than a clean line of light. The standard solution is a system of LED channels and diffusers. This combination does more than just hide the dots; it provides protection, helps manage heat for a longer lifespan, and delivers a professional, finished appearance. This guide breaks down the seven main reasons why this system is not just an aesthetic choice, but a fundamental part of any quality installation.
What are LED Channels
An LED channel is a rigid housing, typically made of aluminum, that encloses an LED strip light. It serves as both a protective shell and a critical component for heat management. The aluminum frame shields the fragile strip from dust and physical damage while providing a straight, clean guide for mounting. More importantly, it acts as a heat sink, drawing warmth away from the LEDs. This thermal management prevents overheating, which helps the strip last longer and perform consistently.

What are LED Diffusers
An LED diffuser is the plastic cover that snaps onto the channel. Its primary job is to scatter the light from the individual chips on the LED strip. By doing this, it transforms a series of harsh dots into a smooth, uniform line of light. This process eliminates the distracting "hotspot" effect and also reduces glare, making the light more comfortable on the eyes and preventing harsh reflections on shiny surfaces.
Reason 1: For Smooth, Spot-Free Lighting
A bare LED strip rarely looks like a solid line of light. Instead, you see a row of individual bright dots. This effect, often called "hotspots," can make an installation look unfinished and cheap. A diffuser is the standard way to solve this problem.
Light Diffusion Principles
A diffuser works by scattering light. As the light from each individual LED chip passes through the semi-opaque plastic cover, it is spread out in many directions. This breaks up the harsh, concentrated point of light. The scattered light from one LED blends with the light from its neighbors, creating the impression of a single, continuous light source.
The "Dotless" System
Achieving a perfectly "dotless" look depends on more than just the diffuser. It is a balance of three factors:
- Diffuser Opacity: A milkier, more opaque diffuser scatters more light and is better at hiding dots, but it also reduces overall brightness. A frosted diffuser offers a compromise between brightness and diffusion.
- LED Strip Density: Strips with more LEDs per foot have less space between them, making it easier to blend the light. COB strips, which have a continuous phosphor coating, produce a dotless light even without a diffuser.
- Channel Depth: A deeper channel increases the distance between the LED chips and the diffuser. This extra space gives the light more room to spread out and mix before it hits the surface, which significantly improves the blending effect.

Diffuser Material Choice
The two most common materials for diffusers are polycarbonate (PC) and acrylic (PMMA). Each has its own trade-offs.
Attribute | Polycarbonate (PC) | Acrylic (PMMA) |
|---|---|---|
Impact Resistance | Excellent (Virtually unbreakable) | Low (Brittle, can crack) |
Scratch Resistance | Lower (More prone to scratches) | Higher (More durable surface) |
Optical Clarity | Good | Excellent (Higher light transmission) |
UV Stability | Good (Requires UV coating) | Excellent (Naturally resists yellowing) |
Ideal Use Case | High-traffic areas, floors, public spaces | Protected indoor and decorative applications |
Polycarbonate (PC) is extremely durable and impact-resistant, making it ideal for areas with high traffic or where the fixture could get bumped. Its downside is that it scratches more easily than acrylic.
Acrylic (PMMA) offers better optical clarity and is more resistant to scratches. It is also less prone to yellowing from UV exposure. However, it is more brittle and can crack or shatter if struck hard.
Reason 2: To Guard Strips from Dust and Damage
An LED strip is essentially an exposed circuit board. The individual diodes and solder points are fragile and vulnerable to the surrounding environment. An aluminum channel provides a rigid shell that protects this investment.
Physical Impact Protection
The solid aluminum body of the channel acts as a shield. It guards the LED strip against accidental bumps, scrapes, and bends that could otherwise damage the circuitry and cause sections of the light to fail. This is particularly important for installations in accessible areas like under cabinets, along stairways, or in workshops.
Environmental and Water Protection
When sealed with end caps, a channel system encloses the LED strip, protecting it from dust and moisture buildup. Dust can act as an insulating blanket, trapping heat and shortening the strip's life. More importantly, a properly sealed, waterproof-rated channel allows you to safely use even non-waterproof LED strips in damp locations like bathrooms or covered outdoor areas. This gives you the freedom to choose high-performance strips, which often only come in non-waterproof versions, for any project.
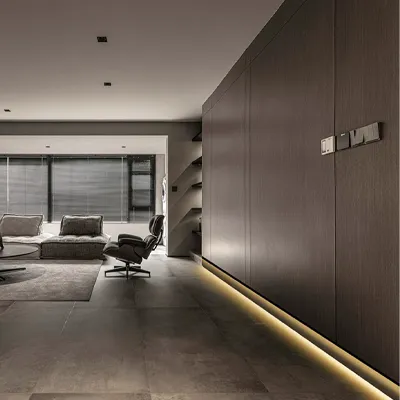
Reason 3: For a Clean, Finished Look
A well-designed space is defined by its details. Using a bare LED strip can look like an afterthought, with its visible circuitry and wires detracting from the overall design. Channels transform the raw component into a deliberate, integrated part of the architecture.
Integrated Aesthetics
An aluminum channel provides a clean, minimalist housing that hides the "in-progress" look of a raw LED strip. The channel conceals the yellow phosphor of the diodes, the solder points, and any messy wiring, presenting only a sleek fixture. This elevates the installation from a simple DIY project to a refined piece of lighting that complements modern design.
Professional Finishing Touches
A professional installation is completed by its accessories. End caps give the channel a clean termination, preventing light leaks and keeping dust out. Mounting clips or brackets secure the channel far more reliably than adhesive backing alone, ensuring it stays in place permanently. These small parts are what create a truly finished and durable fixture.

Higher Perceived Value
The difference between a tacked-on strip and a channel-mounted light is immediately obvious to any observer. A clean, integrated installation signals quality craftsmanship and attention to detail. For contractors and designers, this professional finish helps justify the cost of custom work and aligns the quality of the lighting with high-end materials and cabinetry, thereby increasing the project's overall perceived value.
Reason 4: For Cooler, Longer-Lasting Lights
Heat is the primary enemy of an LED's lifespan. While LEDs are far more efficient than incandescent bulbs, they still convert a significant portion of electricity into heat. If that heat is not managed, the LED will fail prematurely.
Thermal Management Function
Aluminum is an excellent thermal conductor. An LED channel's primary technical function is to act as a heat sink, pulling heat away from the sensitive LED chips and dissipating it into the surrounding air. This process keeps the LEDs operating at a lower temperature, which is the single most important factor in ensuring a long and stable operational life.

Warranty Compliance
For professionals, this is a non-negotiable point. Most manufacturers of high-performance or high-density LED strips require them to be mounted on a sufficient heat sink (like an aluminum channel) as a condition of their warranty. Installing a powerful strip without a channel is not just poor practice; it can void the warranty. This leaves the installer financially responsible for the full cost of replacement if the strip fails due to overheating.
The Physics of Heat Failure
High temperatures cause the materials inside the LED to degrade faster. This degradation leads to two main problems:
- Lumen Depreciation: The light output permanently decreases. The industry standard for an LED's "useful life" is L70, the point at which it has lost 30% of its initial brightness. Higher heat accelerates this process dramatically.
- Color Shift: Heat can also cause the color of the light to change, often shifting to a warmer, yellower hue. This can ruin the consistency of a lighting design.
Reason 5: For Straight and Secure Mounting
The flexible nature of an LED strip can make it difficult to install in a perfectly straight line. Likewise, the adhesive backing may not be reliable on all surfaces. A channel solves both of these common installation problems.
Perfectly Straight Lines
The rigid structure of the aluminum channel acts as a perfect guide. It ensures that your installation results in a clean, straight line of light, free of the waves or sags that can occur when a strip is applied directly by hand.
Mounting on Any Surface
LED strip adhesive often fails on textured, porous, or uneven surfaces like raw wood or certain painted drywall. A channel can be securely fastened with mounting clips and screws to virtually any surface. The strip is then applied to the smooth interior of the channel, guaranteeing a strong, permanent bond.
Structure and System Decoupling
Using a channel "decouples" the lighting system from the building's finished surfaces. If a strip light fails years later, it can be easily removed from the channel and replaced without ripping off paint or damaging the underlying wood or drywall. This design principle makes future maintenance and upgrades simple and damage-free, a significant long-term benefit for any property owner.
Reason 6: To Build Your Own Custom Fixtures
With a diverse range of available profiles, an LED channel is more than just a housing; it's a modular building block for creating custom lighting fixtures. This allows for a level of design integration that is impossible with bare strips alone.
The Fixture Mindset
A key mental shift for designers and builders is to stop seeing the channel as an accessory and start seeing it as the fixture itself. The LED strip is merely the light source, like a bulb. This perspective opens up endless design possibilities. You are no longer just "hiding a strip light"; you are specifying a surface-mounted light, a recessed downlight, or a corner fixture, all built from this versatile system.
Profile Types and Applications
Different channel profiles are engineered for specific architectural applications, allowing light to be placed exactly where it's needed.


Profile Type | Visual Cross-Section | Primary Application | Key Design Effect |
|---|---|---|---|
Surface-Mount | Standard U-Shape | Under cabinets, shelves, general tasks | Clean, visible linear fixture |
Recessed | T-Shape with Flanges | Grooves in wood, drywall, or tile | Flush and seamless with the surface |
Corner-Mount | 45° Angled V-Shape | Wall/ceiling corners, display cases | Directional light from a corner |
Plaster-In (Trimless) | Perforated Wings | Embedded into drywall/plaster | Invisible source, pure line of light |
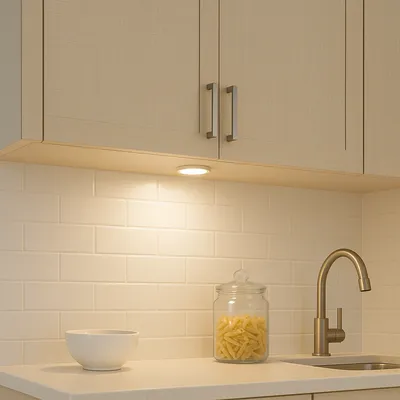
- Surface-Mount: The standard U-shaped profile for general use, like under cabinets or inside shelving.
- Recessed: Designed with "wings" or flanges to be installed flush into grooves in drywall or wood for a seamless, built-in look.
- Corner-Mount: Fits into 90-degree corners and directs light out at a 45-degree angle, perfect for display cases or accenting architectural lines.
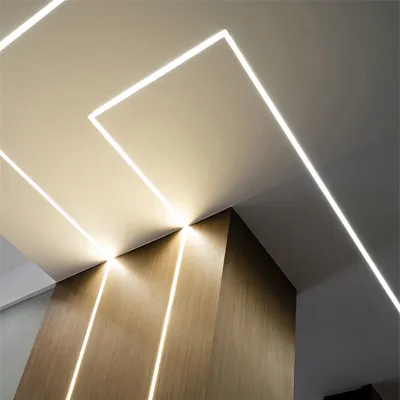
- Plaster-In (Trimless): A specialized recessed profile where the flanges are covered with plaster and painted over, making the aluminum fixture itself completely invisible, leaving only a clean line of light in the wall or ceiling.

Common Design Examples
This system enables many professional lighting techniques. Channels can be used to create long, continuous lines of light for cove lighting, provide functional task lighting under kitchen cabinets, add safety and drama with stair lighting, or wash walls with an even glow.
Reason 7: For Easy Maintenance and Upgrades
The initial cost of an LED channel is an investment that pays off significantly over the life of the installation, primarily by simplifying maintenance and reducing long-term costs.
Damage-Free Removal
Trying to remove an LED strip that has been glued directly to a finished surface often results in disaster. The strong adhesive can easily rip off paint, tear drywall paper, or splinter wood veneers. When a strip is inside a channel, it can be peeled out and replaced without any damage to the surrounding structure.

Total Cost of Ownership (TCO)
The real cost of a lighting installation is not just the price of the parts, but the total cost over its lifetime. A bare strip that fails prematurely due to heat or damage can be expensive to fix. The cost of hiring a technician to remove the old strip, repair the damaged surface, and install a new one can easily run into hundreds of dollars. The small upfront cost of a channel system acts as an insurance policy against these high future labor costs.
Simplified Future Upgrades
Lighting technology evolves. In five or ten years, you may want to upgrade to a more efficient or feature-rich LED strip. Because the channel system is decoupled from the building structure, this upgrade process is simple. The old strip can be pulled out and the new one laid in, without requiring any destructive construction work. This makes the entire lighting system future-proof.
Conclusion
Using a channel and diffuser is what separates a temporary setup from a durable, integrated lighting fixture. It is the established method for any professional-quality project.
Summary of Reasons
A channel system addresses the entire lifecycle of an LED strip. It refines the light from harsh dots into a smooth line. It provides physical protection from damage. The aluminum manages heat, which helps the strip reach its full lifespan and keeps its warranty valid. The system also offers a framework for building custom fixtures and makes future maintenance more economical.
Actionable Guidelines for Professionals
Applying these principles will help you deliver consistent quality and value.
- Specify as a System: Treat the channel, diffuser, and strip as a single, interdependent unit.
- Make Heat Sinks Mandatory: For any high-output strip, an aluminum channel is a required component, not an option. Check the manufacturer's warranty terms.
- Engineer the "Dotless" Effect: Balance channel depth, LED density, and diffuser opacity to achieve the desired look.
- Justify with TCO: Frame the channel's upfront price as insurance against higher labor and replacement costs in the future.
Frequently Asked Questions
Can you cut aluminum LED channels?
Yes, aluminum channels can be cut to a specific length. For a clean cut, it is best to use a miter saw with a blade designed for non-ferrous metals. A hacksaw with a fine-toothed blade will also work. The plastic diffuser can typically be cut with the same tool.
Do you need a diffuser for COB LED strips?
While a diffuser is not needed to hide dots on a COB strip, it is still recommended. A clear cover offers physical protection without changing the light. A frosted or milky diffuser can further soften the light to reduce glare on reflective surfaces and give the fixture a more uniform, finished appearance when turned off.
Can you paint an LED channel?
Yes, you can paint the aluminum channel to match your mounting surface. For the best adhesion, lightly scuff the surface with sandpaper, apply a self-etching metal primer, and then finish with your chosen paint. This helps the fixture blend in seamlessly for a more discreet look.
Are all aluminum channels suitable for outdoor use?
No. For outdoor or wet environments, you must use channels made from anodized aluminum. The anodizing process adds a protective layer that prevents rust and corrosion. You must also use waterproof end caps and a suitable sealant to create a fully protected, weather-resistant system.