When a GE dimmer switch begins to malfunction, showing issues like flickering lights, unresponsiveness, or disconnection from your smart home system, it can detract from your home's intended comfort and control. This 2025 guide offers clear steps to help reset these devices and address such common problems. While GE produces various dimmer types, including traditional dials, this guide gives particular attention to the frequently installed smart dimmer models (like Z-Wave and Cync Wi-Fi). These smart variants often require specific reset procedures as part of troubleshooting due to their network connectivity and app features. Our aim is to provide reliable instructions covering the most typical scenarios.
IMPORTANT: Safety First! Before You Begin Resetting
Before undertaking any hands-on reset procedures with your dimmer switch, addressing electrical safety is the necessary starting point. Interacting with household wiring requires caution to avoid potential hazards. Please follow the safety steps below carefully before proceeding.
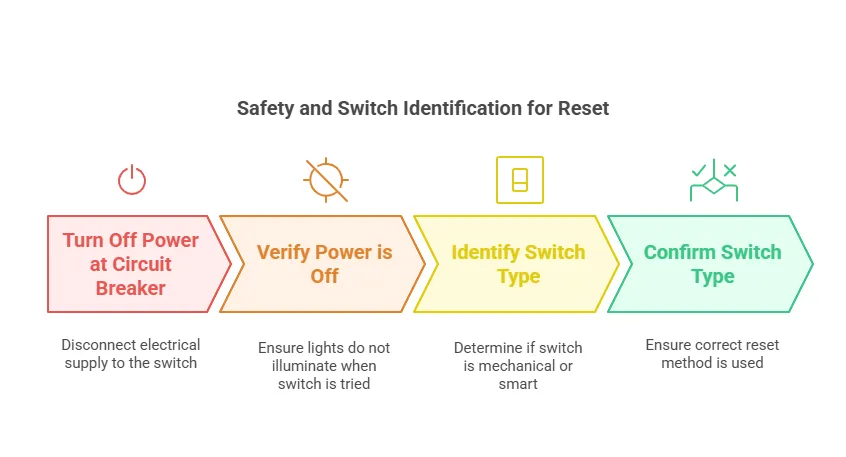
Turn Off Power at the Circuit Breaker
The initial action is always to disconnect the electrical supply to the switch. Go to your home's main electrical panel, find the circuit breaker linked to the dimmer switch, and move its lever to the OFF position. Then, confirm the power is off by trying the switch itself; the connected lights should not illuminate. Only after verifying the circuit is inactive should you continue. This precaution removes the risk of electrical shock during the process.
Identify Your Switch Type (Crucial for Correct Steps)
Next, determine the specific model of your GE dimmer. GE's products include both standard mechanical dimmers and smart switches using technologies such as Z-Wave or Wi-Fi (Cync). Knowing your switch type is key because the reset methods differ substantially. A reset sequence for a smart Z-Wave switch, for example, will not function for a basic mechanical model. Identifying your switch accurately ensures the instructions provided later are applicable and will lead to an effective reset, preventing wasted time or confusion.
Identifying Your GE Dimmer Switch: Smart vs. Non-Smart
Alright, the first step in tackling a reset is knowing exactly what kind of GE dimmer you're working with. Why? Because the internal technology dictates the reset procedure. A simple dial that just fades lights up and down operates very differently from a smart switch that talks to your home network. Mixing up the procedures won't just be ineffective; it could be confusing. Let's clarify the two main families:
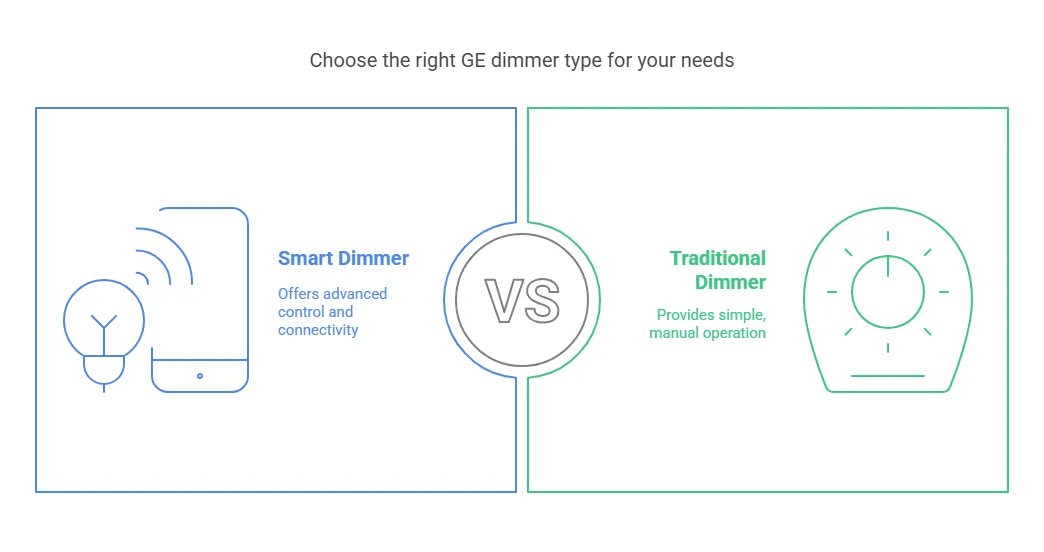
Is it a GE Smart Dimmer (Z-Wave, Zigbee, Wi-Fi/Cync)?
You'll know you have a smart dimmer if it's designed to be part of a larger connected home system. Here are the telltale signs:
- Network Smarts: The defining feature is its ability to communicate wirelessly. If you control it with a smartphone app (like Cync), voice commands (Alexa, Google), or through a central smart home hub (using Z-Wave or potentially Zigbee protocols), you've got a smart dimmer.
- The Little LED Light: Most models sport a small LED indicator. This isn't just for show; it often signals network status, confirms commands, or helps during the pairing process (a flashing blue light, for instance, is common during Z-Wave pairing).
- Modern Controls: While a few smart dimmers might retain a dial, the vast majority use a paddle switch design – press the top to turn on or brighten, the bottom for off or dim. You might also find tiny configuration buttons hidden away.
- Look for Keywords: Check the device itself or any packaging/documentation for terms like "Z-Wave," "Zigbee," "Wi-Fi," "Cync," "Enbrighten," or "Jasco." These explicitly point to smart capabilities.
Is it a Traditional (Non-Smart) GE Dimmer Dial?
These are the straightforward workhorses of manual lighting control. Their characteristics are usually quite distinct:
- Purely Manual Control: The main interface is typically a physical knob you turn for brightness. Pressing it might toggle power. There's no app control, no voice commands, no network connection – it operates solely based on your direct interaction.
- Simplicity Inside and Out: You generally won't find status LEDs or extra buttons. What you see is what you get.
- Troubleshooting is Different: Since there's no network or complex software involved, problems with these dimmers usually point towards basic electrical issues: faulty wiring, incompatibility with the light bulb (especially some LEDs), or simply the dimmer failing due to age or an electrical surge. A "reset" usually just means cycling power at the breaker, but often, if it's malfunctioning, replacement is the practical solution.
How to Reset GE Dimmer Dial Light Switch (Smart & Z-Wave Focus)
Now that you have a better idea of your switch type, let's get into the reset procedures. We're putting a spotlight on the smart switches here, especially the Z-Wave variants, simply because connectivity issues and software glitches are common reasons users seek out reset instructions for these models. Remember that safety step: ensure the power is off at the breaker before physically interacting with the switch, like using an Air Gap feature.
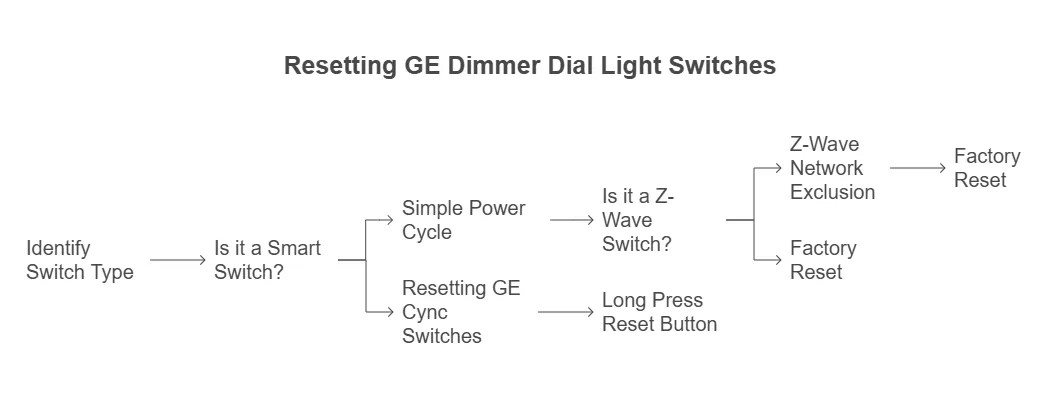
Method 1: Simple Power Cycle (Soft Reset via Air Gap or Breaker)
Think of this as the classic "reboot" for electronic devices. It’s often the first thing to try when a smart switch becomes temporarily unresponsive or acts a bit flaky. It forces the switch's internal processor to restart, clearing out minor glitches without erasing any settings.
- The Air Gap Switch Route: Many GE smart switches cleverly include a small pull-out tab at the bottom (the Air Gap). Pulling this tab out physically cuts power just to the switch itself. Leave it out for about 30 seconds, then push it back in firmly. It's a convenient way to power cycle without hiking to the breaker box.
- The Breaker Route: If there's no Air Gap tab or if using it didn't help, fall back to the main circuit breaker. Switch off the breaker feeding that circuit, wait a solid minute (this ensures everything fully discharges), then switch it back on.
Method 2: Z-Wave Network Exclusion (Often Required Before Re-Pairing or Factory Reset)
This step is specific to Z-Wave devices and is crucial when you suspect network communication problems. Exclusion is the formal Z-Wave process for telling the central hub to remove the switch from its list of controlled devices. Why do this? Sometimes the connection data between the hub and switch gets corrupted, causing commands to fail. Exclusion cleans up that link. It’s also often a mandatory first step before a switch will allow itself to be re-included (paired) to the network or fully factory reset.
- Start at the Hub: First, put your Z-Wave hub into its "exclusion" or "remove device" mode using its app or interface.
- Action at the Switch: Once the hub is listening for a device to remove, you need to trigger the exclusion on the dimmer itself. The most common sequence for GE/Jasco Z-Wave dimmers is a rapid triple-tap on either the top (ON) or bottom (OFF) part of the paddle. Listen for confirmation from your hub (it should report a device removed) and watch the switch's LED for any confirmation blinks.
- The Variation Caveat: While triple-tap is common, some models might use a single tap, double tap, or a different sequence. If triple-tap doesn't yield results, consulting the manual for your specific model number becomes necessary – Z-Wave has evolved over time.
Method 3: Factory Reset (Hard Reset - Erases All Settings)
This is the "nuclear option." A factory reset wipes the switch completely clean, returning it to its default state as if it just came out of the box. All network pairing, any custom settings (like dimming speed, minimum/maximum brightness levels) are gone. You'd typically consider this only if: exclusion failed repeatedly, the switch is behaving very erratically in a way a power cycle or exclusion didn't fix, or you're preparing to remove it permanently or sell it.
- Try Exclusion First: Because a factory reset requires re-pairing from scratch, it's usually less disruptive to try exclusion first (Method 2). A successful exclusion often resolves pairing problems without needing this full reset.
- The Reset Dance: Again, the exact button presses vary widely. A frequent pattern for many GE/Jasco Z-Wave models is a rapid sequence of 10 taps on the top (ON) button. But don't take this as gospel; others might require holding a button down for 10-15 seconds, or a combination press. Checking the manual for your specific model is absolutely essential here to avoid frustration.
- Confirmation and Consequence: A successful factory reset is usually confirmed by a specific LED flashing pattern. Afterwards, the switch is a "blank slate" and invisible to your Z-Wave network until you go through the full pairing (inclusion) process again.
Resetting GE Cync (Wi-Fi) Dimmer Switches
If your investigation pointed towards a GE Cync dimmer, you're dealing with Wi-Fi, not Z-Wave, so the reset process is tailored to that technology. It's generally about resetting the Wi-Fi connection and triggering its setup mode.
- The Usual Suspect: The Long Press: For most Cync dimmers, the reset involves pressing and holding the main power button (or sometimes a dedicated small reset button/pinhole) for about 10 to 15 seconds.
- Ready for Setup: You'll know it worked when the LED indicator starts flashing (often blue), signaling it's cleared its previous Wi-Fi settings and is broadcasting its own temporary network, waiting for you to connect via the Cync app to configure it onto your home Wi-Fi.
- Go to the Source: Wi-Fi setups can have nuances. The definitive instructions for your specific Cync model will always be found within the Cync mobile app itself or on the official Cync support pages.
After the Reset: What's Next? (For Smart Switches)
So, you've gone through the reset procedure for your smart switch – maybe an exclusion followed by re-inclusion, or even a full factory reset. What now? Well, unlike flipping a breaker off and on, resetting a smart switch often means you've temporarily kicked it off the network or wiped its brain clean. It won't just magically start working with your hub or app again. You need to formally bring it back into the fold.
Re-Pairing Your GE Z-Wave Switch
If you performed a Z-Wave exclusion or a factory reset, your switch is now essentially an outsider to your Z-Wave network. You need to "include" or "pair" it again. Think of it like re-introducing someone at a party after they stepped out for a bit.
- Put Your Hub in Pairing Mode: Grab your Z-Wave hub's app or interface and find the option to "Add Device," "Include Device," or "Start Pairing." Get your hub listening.
- Trigger Pairing on the Switch: Just like with exclusion, you need to tell the switch "Okay, I'm ready to join." Go to the switch and perform the inclusion action. Again, for most GE/Jasco Z-Wave dimmers, this is typically that same rapid triple-tap on the top or bottom paddle.
- Follow the Hub's Lead: Your hub should detect the switch and guide you through the rest – naming it, assigning it to a room, etc. Watch for confirmation on both the hub and possibly the switch's LED.
Re-Pairing Your GE Cync (Wi-Fi) Switch
If you reset a Cync Wi-Fi switch, you've essentially told it to forget your home Wi-Fi network. Re-pairing means reconnecting it.
- Use the Cync App: Open the Cync mobile app on your phone or tablet. Look for an option like "Add Device" or a plus (+) symbol.
- Follow App Instructions: The app will typically guide you through the process, which usually involves connecting your phone temporarily to a setup network broadcast by the switch itself, then providing your home Wi-Fi credentials so the switch can get back online. Just follow the prompts on the screen – Cync generally makes this pretty straightforward.
Troubleshooting: Reset Didn't Work? Consider These
Okay, so you've tried the reset procedures, maybe even re-paired the switch, and it's still giving you grief. Lights flickering, no response, just dead... what gives? Resetting isn't always the silver bullet. Sometimes the problem lies elsewhere. Before you declare the switch dead and head to the store, let's run through a few common culprits – things we often see causing issues that a reset won't fix.
Check Wiring and Connections (Power OFF First!)
I know, I know, we sound like a broken record, but turn that breaker off again before you even think about loosening a wire nut. Loose connections are surprisingly common causes of switch misbehavior. A wire nut not tightened properly, a wire not fully seated under a screw terminal – these can cause intermittent operation, flickering, or complete failure.
- Safety Check: Breaker OFF. Confirmed? Good.
- Visual Inspection: Carefully remove the switch from the wall box (without yanking wires). Look closely at each connection point. Are all wires securely fastened? Any signs of scorching or damage on the wires or the switch body? Gently tug each wire at its connection point to ensure it's tight.
- If Unsure, Call a Pro: If you're not comfortable working with wiring, or if anything looks damaged or confusing, stop right there. Call a qualified electrician. It's not worth the risk.
Verify Light Bulb Compatibility (Especially with LEDs)
This one trips up a lot of people, especially with dimmers and modern LED bulbs. Here's the deal: not all LED bulbs are designed to be dimmed. And even among dimmable LEDs, not all play nicely with every single dimmer switch out there. This mismatch can lead to all sorts of weirdness:
- Flickering at certain brightness levels.
- Buzzing sounds from the bulb or switch.
- Lights not turning off completely ("ghosting").
- The dimmer itself seeming unresponsive or erratic.
- The Test: The easiest way to check is to temporarily swap in a bulb you know is compatible, or even an old-fashioned incandescent bulb if you have one lying around (they almost always work with any dimmer). If the problem disappears with the test bulb, you've likely found your culprit – the original LED bulb(s). Look for LEDs explicitly labeled "dimmable" and consider checking the dimmer manufacturer's compatibility list if problems persist.
Why Did My Dimmer Switch Suddenly Stop Working? (Possible Causes)
It's frustrating when something works fine one day and is dead the next. While a reset might revive it if it was just a software glitch (for smart switches), a sudden failure could point to other issues:
- Power Surge: A nearby lightning strike or even a surge from a large appliance cycling on/off could have fried the switch's sensitive internal components.
- Component Failure: Like any electronic device, dimmers have a lifespan. Internal parts can simply wear out and fail over time.
- Overheating: If the dimmer was controlling a load close to its maximum wattage rating, especially in a crowded electrical box with poor airflow, heat could have caused damage.
- Wiring Fault (Beyond Loose Connections): Less common, but a short circuit somewhere in the wiring could have occurred.
- Network Issues (Smart Switches): For smart switches, problems at the hub, router, or even with the manufacturer's cloud service could make the switch seem unresponsive, even if the switch itself is technically okay (though a reset often helps diagnose this).
How to Check if a Light Switch is Bad?
So, you've done the reset, confirmed the power is on at the breaker, checked the wiring connections (safely!), and tested with a known good bulb. If the switch still doesn't work – no lights, no response to button presses, no LED activity (if it's a smart switch) – you've done a pretty thorough job of eliminating external factors. At this point, the most likely conclusion is that the switch unit itself has failed internally. It's essentially a process of elimination. If everything else checks out, the switch is the prime suspect.
Consult Specific Manuals or GE/Jasco/Cync Support
Sometimes, you hit a wall. Maybe you have an obscure model with a unique reset sequence, or you're seeing a specific error code on the LED that this guide doesn't cover. That's when you go back to the source.
- Find Your Model Number: Look on the switch itself (often on the side or back, requiring removal from the wall – breaker off!) for a specific model number (like the Zw4201 mentioned in PAA).
- Search Online: Use that model number to search for the official PDF manual online. Manufacturer websites (GE, Jasco, Cync/Savant) are the best places. The manual is the definitive guide for your specific device.
- Contact Support: If the manual doesn't help or you're stuck, reach out to the manufacturer's technical support. They deal with these issues day in and day out and might have insights or know about specific firmware bugs or compatibility problems. Have your model number ready when you contact them.
Frequently Asked Questions (FAQ)
Here are answers to a few common questions that often come up when dealing with GE dimmer resets, going beyond the main procedures:
Q: Can resetting my GE dimmer fix lights that won't turn off completely (ghosting)?
A: Sometimes, particularly with smart dimmers, a software glitch could be the culprit, making a power cycle (Method 1) worth a shot. However, more often than not, especially when dealing with LED bulbs, "ghosting" points directly to a compatibility mismatch between the bulb and the dimmer. Even LEDs marked "dimmable" don't always cooperate perfectly with every dimmer circuit, allowing a tiny bit of current to leak through, keeping the filament faintly glowing. If a reset doesn't solve it, the most practical next step is usually trying a different brand or model of dimmable LED bulb known to work well with your dimmer type. It's often about finding that compatible pair.
Q: What does the flashing blue light on my GE Z-Wave dimmer typically mean?
A: That flashing blue LED is the switch's primary way of communicating its Z-Wave network status. While the specifics can sometimes vary slightly between models (always good practice to glance at the manual!), here's the usual code: A slow, steady blue flash often indicates it's in pairing (inclusion) or removal (exclusion) mode, waiting for a command from the hub. Rapid or erratic blue flashing might signal an error during communication, or sometimes confirm a command was received. If you see it flashing unexpectedly and the switch isn't responding to commands, it's a strong hint there's a breakdown in communication with your Z-Wave hub. Running the exclusion process (Method 2), followed by re-inclusion, is the standard fix for these network hiccups. Think of the light as the switch trying to signal its network health.
Q: Does performing a factory reset on the switch automatically remove it from my Z-Wave hub?
A: Not necessarily, and this trips up many Z-Wave users. Performing the factory reset sequence on the switch itself (Method 3) erases the switch's memory, yes, but it doesn't send a "goodbye" message to your Z-Wave hub. The hub might still think the device exists, leading to what's called a "ghost node" – an unresponsive device cluttering up your network list. This is precisely why the recommended Z-Wave best practice is always to attempt Exclusion (Method 2) first. Exclusion is the clean handshake where both the switch and the hub agree to part ways. If you must factory reset because exclusion failed, be prepared that you might need to manually remove the resulting dead node from your hub afterwards, using your hub's specific cleanup tools. Maintaining a clean Z-Wave network avoids future headaches.
Q: Can I reset just the custom dimming levels (like min/max brightness) without a full factory reset?
A: Generally, no, not through the reset procedures we've discussed. A simple power cycle (Method 1) just reboots the switch; it doesn't touch stored settings. A factory reset (Method 3) wipes everything. Those custom dimming parameters – like setting a minimum brightness level so LEDs don't drop out, or adjusting the fade rate – are typically configured after the switch is paired, using the advanced settings within your Z-Wave hub's interface or through the Cync app for Wi-Fi models. If you want to tweak those levels, you need to go into those configuration menus, not perform a device reset. Resetting is aimed at fixing fundamental operational or connectivity problems, not fine-tuning performance settings.
Q: If I reset my smart dimmer, will I lose the schedules or automations it was part of?
A: Yes, that's a very likely consequence, especially after a factory reset (Method 3) and often even after an exclusion/re-inclusion cycle (Method 2). The reason is that your schedules and automations (like "turn on porch light at sunset" or "if motion detected, set dimmer to 50%") usually reside within your smart home hub or the associated cloud service (like Cync Cloud), and they are tied to that specific instance of the paired device. When you reset and re-pair the switch, your hub often registers it as a completely "new" device, even if you give it the same name. So, unfortunately, you'll almost certainly need to go back into your hub's app or the Cync app and manually re-add the newly paired switch to all the scenes, routines, scheduled events, and automations it was previously involved in. It’s a bit of post-reset cleanup you should anticipate.


